
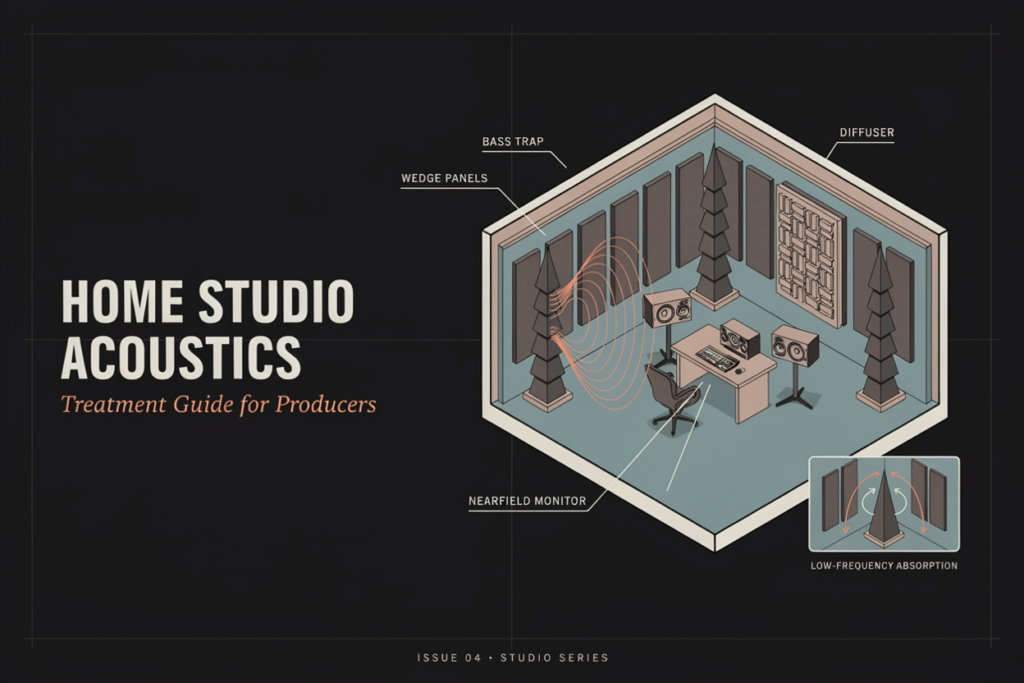
Home studio acoustics improve with symmetrical monitor placement, thick low-frequency absorption, and broadband treatment at first reflection points. Start with the layout, treat damaging reflections, and measure before adding more material.
A small studio does not need to be silent or completely dead. It needs controlled reflections and even decay so you can hear balances, panning, EQ, and reverb without the room misleading you. For more on direct and reflected sound, see this room acoustics guide.
What Are Home Studio Acoustics, and Why Do They Matter?
Home studio acoustics describe how sound behaves inside your recording and mixing space. Walls, the ceiling, the floor, furniture, and equipment reflect or absorb different frequencies, changing what reaches the microphone and your ears.
The direct sound from a monitor reaches you first. Reflected sound arrives milliseconds later after bouncing from nearby surfaces. Strong early reflections can blur the stereo image and create comb filtering, a pattern of peaks and dips caused when delayed sound combines with direct sound. Low frequencies can also form room modes, producing locations where particular bass notes sound exaggerated or unusually weak.
These effects can make you compensate for the room instead of the recording. A bass-heavy room may make you remove too much low end, while a cancellation may tempt you to boost a frequency that was already present.
Acoustic treatment and soundproofing solve different problems. Treatment manages reflections and decay. Soundproofing reduces transmission through the building and usually requires structural work involving mass, airtight construction, isolation, and ventilation. Wall panels or foam do not soundproof it. A practical acoustic treatment overview explains treatment types.
How Should You Position Monitors and the Listening Spot?
Place the workstation on the room’s line of symmetry, aim both monitors toward the listening position, and keep the left and right sides as acoustically similar as possible. The two speakers and your head should form an equilateral triangle, creating an angle of about 60 degrees between the monitors as viewed from the listening position.
Start With a Symmetrical Layout
In a rectangular room, facing the shorter wall often gives the speakers more distance to project along the room’s longer dimension. Avoid placing the desk in a corner or setting one speaker beside a wall while the other faces open space. Unequal boundaries create different reflections and bass responses for the left and right channels.
Keep monitor height consistent, with the tweeters approximately at ear level unless the manufacturer specifies otherwise. Avoid firing their output directly across a large bare desktop.
Test Speaker and Listening Distances
Fixed room-percentage rules are starting points, not guarantees. Dimensions, construction, openings, and speaker-boundary interference change the best location. Move the speakers and chair in small increments and compare several positions.
Monitor distance from the front wall also affects bass response, and small changes can shift cancellations. Follow the maker’s boundary guidance, test available positions, and keep both speakers equally spaced from side boundaries. The recording studio setup guide connects layout, equipment, and workflow.
Which Acoustic Problems Should You Treat First?
Treat low-frequency buildup and first reflections before worrying about decorative foam or diffusion. Thick absorption in corners and broadband panels at sidewall and ceiling reflection points usually address the most consequential problems in a small room.
| Audible symptom | Likely acoustic cause | First response |
|---|---|---|
| Boomy or slow bass | Room modes and long low-frequency decay | Adjust placement and add deep corner absorption |
| Some bass notes disappear | Modal nulls or speaker-boundary cancellation | Move the speakers or listening position; do not simply boost EQ |
| Vague center image | Strong early sidewall or ceiling reflections | Add matched broadband panels at first reflection points |
| Rapid metallic echo | Flutter echo between parallel hard surfaces | Add absorption or furnishings to one or both opposing surfaces |
| Recordings sound boxy | Short reflections near the microphone | Change mic position and treat nearby boundaries |
| Room feels unnaturally dull | Too much thin high-frequency absorption | Remove some thin material or restore reflective balance |
Control Low-Frequency Room Modes
Bass trapping requires depth because long wavelengths are harder to absorb. Floor-to-ceiling corner treatment is common because boundaries meet there and multiple modes can be active.
Thin foam may reduce flutter echo, but it does little for serious bass ringing. A dedicated guide to bass-trap placement and construction explains why thicker treatment and an air gap generally extend absorption to lower frequencies.
Absorb First Reflections
Use the mirror method to locate sidewall reflection points. Sit in position while another person moves a mirror along a sidewall. Wherever you can see either monitor is a reflection zone; repeat on both sides and cover the relevant areas with broadband absorbers.
The ceiling creates another reflection path, so a safely installed cloud can improve clarity. A rug mainly absorbs higher frequencies and does not replace broadband panels. Learn how thickness, placement, and air gaps affect acoustic panels.
Use Diffusion Selectively
Diffusion scatters reflected energy instead of absorbing it. A diffuser needs sufficient listening distance and depth to work across a useful frequency range. In a short room, rear-wall absorption is often more practical.
Diffusion becomes worth testing after monitor placement, bass control, and early-reflection treatment are working. The guide to acoustic diffusers explains the difference between genuine scattering devices and irregular surfaces that offer only limited diffusion.
How Much Acoustic Treatment Does a Home Studio Need?
A home studio needs enough treatment to control echoes, early reflections, and uneven decay without removing all acoustic life. Coverage percentage is a poor target because thin and deep absorbers affect different frequencies.
Evaluate Decay Across Frequencies
RT60 is the time sound takes to decay by 60 dB. In small rooms, software may estimate it from a shorter decay range. One average can also hide bass frequencies that ring much longer than the midrange.
Use decay measurements by frequency band alongside the frequency-response graph and your listening tests. The discussion of ideal RT60 targets shows why room volume and purpose matter more than chasing one universal number.
Measure Before Adding More
Take a baseline after arranging the speakers and chair. Add treatment in stages, then measure from the same position. Seek smoother decay, fewer extreme peaks and dips, and better left-right consistency—not a perfectly flat line.
Room correction can reduce certain peaks after the physical setup is optimized. It cannot stop reflections, add bass absorption, or safely fill a deep cancellation.
What Should You Treat on a Limited Budget?
Prioritize placement, broadband first-reflection control, and deep bass absorption.
- No-cost stage: center the desk, establish the equilateral listening triangle, test distances from boundaries, remove rattling objects, and compare several chair positions.
- Starter stage: add matched broadband absorbers at the left and right first reflection points. Add a ceiling cloud if overhead reflections remain strong.
- Expanded stage: install deep corner traps, then assess the front and rear walls with measurements. Add more treatment only where the data and listening tests identify a problem.
Published absorption coefficients can help compare materials, but check the tested thickness, mounting method, and frequency bands.
What Home Studio Acoustic Mistakes Should You Avoid?
The most common mistake is treating only high frequencies. Covering walls with thin foam can remove brightness while leaving bass peaks, nulls, and ringing almost unchanged, producing a room that is dull but still inaccurate.
Other mistakes include confusing treatment with soundproofing, placing panels for appearance instead of reflection paths, applying correction EQ before testing speaker placement, and copying another studio without considering your dimensions.
Do not assume more absorption is automatically better. If recordings become lifeless, check whether too much high-frequency energy has been removed while bass decay remains uncontrolled.
Frequently Asked Questions
Can you acoustically treat a home studio without damaging the walls?
Yes. Freestanding stands and compression-mounted systems can avoid wall holes. Any overhead cloud must use weight-rated hardware attached to a suitable structural point.
Is acoustic foam enough for a small home studio?
Foam may reduce high-frequency flutter echo, but thin foam cannot provide broad control. Small studios usually need thicker absorption and bass trapping.
Should home-studio monitors be placed against the wall?
Some monitors work close to a wall, while others require more distance. Follow the manufacturer’s guidance and test placement.
Do curtains, rugs, and furniture count as acoustic treatment?
Curtains, rugs, and upholstered furniture affect mainly mid and high frequencies. They can reduce brightness or flutter echo but rarely replace low-frequency treatment.
Can room-correction software replace acoustic panels?
No. Correction software adjusts the speaker signal but cannot remove reflections or shorten bass ringing. Use it after placement and treatment.
How can you tell whether a studio has too much acoustic treatment?
Warning signs include dull sound, lifeless recordings, and short high-frequency decay while bass still rings. Measure decay by frequency and restore a balance of absorption and reflection.

Noah Bennett is an audio engineering writer and acoustics specialist at Reverb Calculator. He focuses on reverb time calculation, room acoustics, studio sound design, and music production tools for producers, audio engineers, musicians, and home studio creators.