
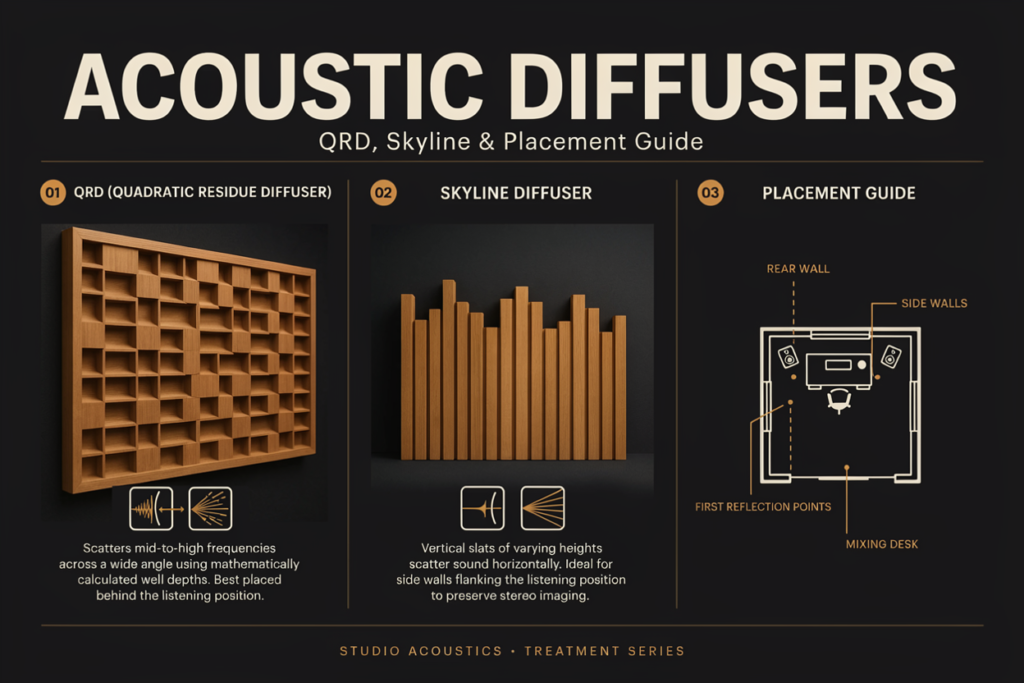
Acoustic diffusers are shaped surfaces that scatter reflected sound in many directions instead of sending one strong reflection into the room. They can reduce flutter echo, reflection hot spots, and unevenness while preserving more energy than absorbers, so a suitable room feels controlled without becoming unnaturally dead.
Diffusion is not a universal cure. Dimensions, tested frequency range, placement, and listening distance determine whether it produces useful scattering or coloration. It belongs in a complete room-acoustics plan, not in a room merely because an irregular wooden surface looks acoustic.
What Are Acoustic Diffusers and What Do They Do?
An acoustic diffuser breaks a strong, mirror-like reflection into many weaker reflections that travel in different directions and arrive at slightly different times. The goal is a more even sound field, not the removal of sound energy.
Diffusion versus ordinary reflection
A flat, hard wall creates a specular reflection, much as a mirror reflects light. Combined with direct sound, the delayed reflection can contribute to comb filtering, blurred stereo imaging, or echo.
A properly designed diffuser uses wells, blocks, curves, or stepped depths to vary the path traveled by different parts of the wavefront. The scattered energy is distributed across a wider range of angles and times, making one dominant reflection less obvious.
What diffusion changes at the listening position
Useful diffusion may increase spaciousness and help reflections decay more smoothly. In a recording room, it can give microphones a less repetitive ambience. In a control or listening room, rear-wall diffusion may reduce a concentrated reflection without removing as much high-frequency energy as absorptive acoustic treatment.
Diffusion does not sound the same everywhere. A listener sitting too close may hear separate wells or blocks interfering with one another rather than a blended diffuse field.
Acoustic Diffusers vs. Absorbers: What Is the Difference?
Diffusers redirect reflected energy; absorbers convert part of that energy into heat through friction or mechanical movement. Absorption is generally the more predictable choice for controlling early reflections in a small room, while diffusion is valuable when there is enough space and the room should retain some liveliness.
| Treatment | Primary action | Best suited to | Main limitation |
|---|---|---|---|
| Diffuser | Scatters reflected sound | Spaciousness, rear-wall reflections, flutter echo, live rooms | Requires sufficient depth and listening distance |
| Porous absorber | Reduces reflected energy | Early reflections, broadband decay control, small rooms | Excessive thin absorption can make high frequencies too dry |
| Bass trap | Reduces low-frequency resonance and decay | Room modes, corners, boundary buildup | Occupies more depth than typical wall treatment |
| Hybrid panel | Combines scattering and absorption | Rooms needing both energy control and liveliness | Performance depends on the verified design |
Standard acoustic panels are often better at first-reflection points in compact mixing rooms. Diffusers also cannot substitute for low-frequency bass control: a shallow structure that scatters midrange and treble will not meaningfully shorten bass ringing.
Balanced treatment commonly uses both methods. Absorption controls the reflections and decay that cause the largest problems; diffusion then redistributes suitable remaining energy.
What Are the Main Types of Acoustic Diffusers?
The main types differ in how they create phase or path-length variation and whether they scatter sound in one or two planes. No type is automatically best; the right choice depends on the wall area, required bandwidth, orientation, and available distance.
| Diffuser type | Scattering pattern | Strength | Practical limitation |
| One-dimensional QRD | Mainly perpendicular to its wells | Predictable, directional scattering from a mathematical depth sequence | Orientation matters; deep wells are needed for lower frequencies |
| Two-dimensional or “skyline” | Horizontal and vertical | Broad spatial scattering from a compact face | Can be heavy and labor-intensive to build accurately |
| Primitive-root diffuser | Usually one-dimensional | Uses a number sequence and may provide strong lateral scattering | Design and bandwidth still depend on exact dimensions |
| Polycylindrical diffuser | Broad reflection from a curved face | Simple, wide-angle redistribution; may be combined with absorption | Not equivalent to the phase distribution of a QRD |
QRD and Schroeder diffusers
A quadratic-residue diffuser, or QRD, contains wells whose depths follow a quadratic-residue number sequence. It belongs to the family of phase-grating diffusers associated with physicist Manfred Schroeder. Vertical wells scatter primarily across the horizontal plane; rotating the diffuser changes that plane.
Skyline and other two-dimensional designs
A skyline-style diffuser uses different-height blocks to scatter across horizontal and vertical planes. Appearance alone is not proof of useful diffusion. Look for measured scattering or diffusion data, a stated operating range, dimensions, and a recommended minimum distance.
How Does Diffuser Size Determine Its Frequency Range?
The deepest depth variation largely influences how low a diffuser can work, while well width or block width helps determine its upper useful range. Lower frequencies have longer wavelengths and therefore require greater physical depth; a shallow decorative panel cannot provide broadband diffusion merely by having many small blocks.
A worked wavelength and distance example
At approximately 20°C, the speed of sound in air is about 343 metres per second. Wavelength can be estimated with:
wavelength = speed of sound ÷ frequency
At 500 Hz, the wavelength is approximately 343 ÷ 500 = 0.686 m. A commonly cited critical-listening guideline recommends sitting about three wavelengths from the lowest diffused frequency, which would be roughly 2.06 m at 500 Hz. A looser practical minimum of 1.5 wavelengths would be about 1.03 m.
These are design guidelines, not a guarantee or universal acoustic standard. The diffuser’s measured polar response, array size, modulation, room geometry, and listening task matter. Arqen’s diffuser guidance notes that many studio diffusers begin around 300–500 Hz and uses the same three-wavelength guideline for critical listening.
Where Should You Place Acoustic Diffusers?
Place diffusers where a problematic reflection has enough travel distance to scatter and blend before reaching the listener or microphone. The rear wall is a common candidate in a sufficiently large control room; absorption is usually safer when the listening position is close to that wall.
Rear walls, sidewalls, and ceilings
Rear-wall diffusion can help create a later, more spatially distributed return in a well-sized recording studio setup. Sidewall or ceiling diffusion may suit larger listening and tracking rooms, but control-room first-reflection points often use absorption because precise imaging takes priority.
Placement should cover the actual reflection zone at ear or microphone height rather than an arbitrary decorative patch. Use the mirror method as a starting point for early reflections, then verify changes by listening and measurement.
Small rooms and common mistakes
In a small home-studio acoustic setup, deal with speaker placement, bass trapping, strong early reflections, and uneven decay before adding diffusion. Rear-wall absorption is usually the safer option when the chair is close to the wall.
Common mistakes include:
- sitting closer than the design’s recommended minimum distance;
- expecting diffusion to fix bass modes or sound isolation;
- buying an irregular panel with no stated or measured bandwidth;
- installing isolated small units where a larger array is required;
- adding more treatment without checking frequency response and decay.
Measurements should be compared before and after installation. A change in reverberation time alone does not prove that scattering is even; impulse response, frequency response, and listening tests reveal different parts of the result.
Frequently Asked Questions About Acoustic Diffusers
Do acoustic diffusers reduce noise?
Acoustic diffusers do not soundproof a room or substantially reduce noise transmission through walls. They redistribute reflections inside the room; isolation requires construction that addresses mass, airtightness, decoupling, and structural paths.
Are acoustic diffusers better than acoustic panels?
Neither treatment is universally better. Absorptive panels are usually more practical for strong early reflections and limited spaces, while diffusers help preserve spaciousness when the room and listening distance support effective scattering.
Can acoustic diffusers control bass frequencies?
Most practical wall diffusers do not control low bass because long wavelengths require considerable depth. Dedicated traps or thick broadband treatment are normally needed to reduce modal peaks and long low-frequency decay.
How far should you sit from a sound diffuser?
Use the manufacturer’s measured data and minimum-distance recommendation first. If those are unavailable, three wavelengths at the diffuser’s lowest effective frequency is a conservative critical-listening guideline, while 1.5 wavelengths is sometimes treated as a practical minimum rather than a guaranteed safe distance.
Can bookshelves function as acoustic diffusers?
A bookshelf with varied book depths can break up some high-frequency reflections, but it is not a predictable broadband diffuser. Its scattering pattern and frequency range are unknown unless measured, so it should not be treated as equivalent to a calculated design.
How much diffusion does a room need?
There is no reliable percentage that suits every room. Diffusion should be added only after room size, listening distance, reflection paths, bass behavior, and the intended RT60 target have been assessed.

Noah Bennett is an audio engineering writer and acoustics specialist at Reverb Calculator. He focuses on reverb time calculation, room acoustics, studio sound design, and music production tools for producers, audio engineers, musicians, and home studio creators.