
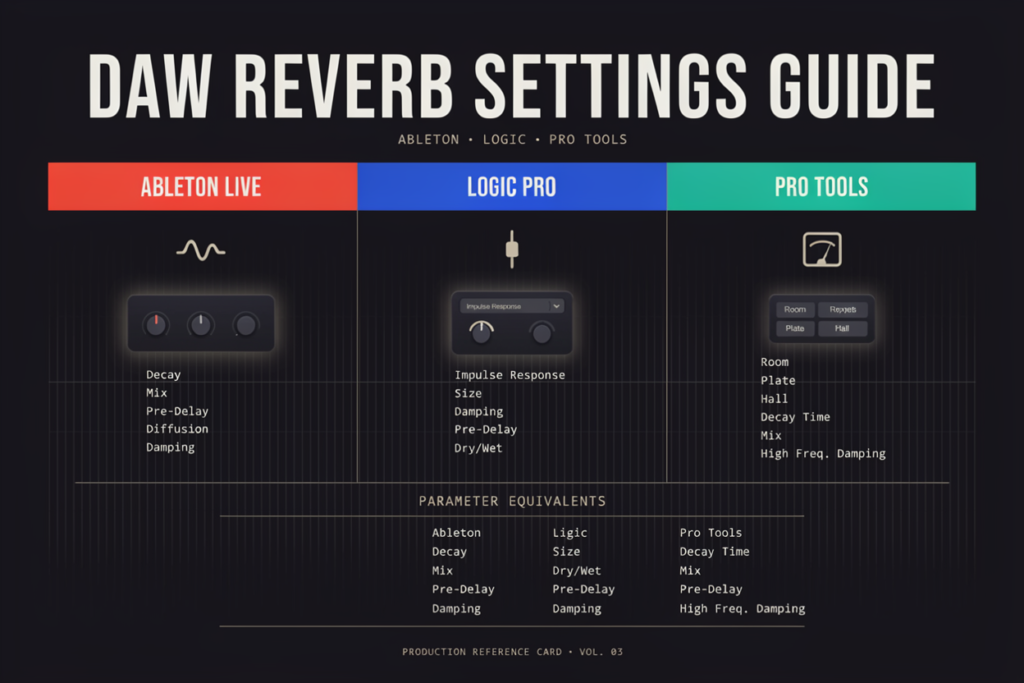
DAW reverb settings work best when they create a believable sense of space without hiding the dry performance. A practical starting point is a room or plate reverb with 10–40 ms of pre-delay, 0.6–1.5 seconds of decay, and a filtered return blended quietly under the source. Treat those values as a starting range, then adjust them for the instrument, tempo, and density of the arrangement.
This guide to using reverb in a mix explains how depth, contrast, and shared space work together.
What Are the Best DAW Reverb Settings?
Try a short room or plate, 10–40 ms of pre-delay, 0.6–1.5 seconds of decay, moderate damping, and low-frequency filtering. On an aux return, use 100% wet and control the amount with each track’s send.
No preset is universal. A sparse ballad can support a long hall, while the same tail may blur a fast, crowded arrangement.
Choose the reverb character first
Room reverbs create compact, natural space and often suit drums or a full ensemble. Plates sound dense and smooth, making them useful for vocals and snares. Halls produce wider, longer tails for sustained sounds, while chambers can add depth without the scale of a concert hall. Spring reverb has a deliberately colored, metallic character often associated with guitar.
Two plugins can interpret “small room” differently, so listen before copying numerical settings. This breakdown of reverb types and their sonic character can help you choose.
Set decay for the arrangement
Decay, reverb time, or RT60 describes how long the reverberant sound takes to fade. Shorter decay keeps busy, rhythmic material defined; longer decay suits sparse arrangements with room between events. If a mix sounds cloudy, shorten the decay before removing the reverb.
What Does Each Reverb Control Do?
Pre-delay controls the gap before reverb begins, decay controls tail length, damping shapes the high-frequency fade, and diffusion controls reflection density. Size and early reflections influence perceived dimensions and proximity.
Pre-delay and clarity
Pre-delay separates the dry attack from the wet signal. Around 0–10 ms merges the source with the room, while 20–80 ms can preserve vocal consonants, snare transients, or guitar pick attack. Longer values may create an audible gap.
The ideal value depends on the performance and intended depth. See how pre-delay changes separation for the relationship between the dry source and the first reflections.
Size, early reflections, and diffusion
Size changes the perceived scale of the virtual space and may also affect decay or reflection spacing. Early reflections are the first simulated wall bounces. Diffusion controls how closely reflections cluster: higher diffusion creates a smoother tail, while lower diffusion can expose individual echoes. Plugin designs differ, so adjust overlapping controls by ear.
Damping, EQ, and stereo width
Damping makes high frequencies fade faster. EQ shapes the wet signal directly. Try a high-pass filter near 150–250 Hz, then soften brightness above roughly 6–10 kHz if the tail competes with vocals or cymbals.
These are starting points, not mandatory cutoffs. For deeper tone shaping, see how frequency response affects a reverb tail.
Stereo width can surround a centered source, but extreme width may become unstable in mono. Reduce it if the reverb disappears or changes tone during a mono check.
Which Reverb Settings Should You Use for Each Instrument?
Instrument-specific settings should be treated as adaptable starting points. Select a character that supports the source, use pre-delay to protect important attacks, and shorten decay as the arrangement becomes faster or denser.
| Source | Reverb type | Pre-delay | Decay | Intended result |
|---|---|---|---|---|
| Lead vocal | Plate or chamber | 25–80 ms | 1.2–2.4 s | Clear, polished depth |
| Backing vocals | Hall or chamber | 10–40 ms | 1.5–3.0 s | Wider, more distant layer |
| Snare | Plate or room | 5–30 ms | 0.5–1.4 s | Body without losing impact |
| Full drum kit | Room or ambience | 0–20 ms | 0.3–1.0 s | Cohesion and believable space |
| Electric guitar | Room, plate, or spring | 10–40 ms | 0.7–1.8 s | Depth with retained pick attack |
| Piano | Room, chamber, or hall | 15–50 ms | 1.0–2.5 s | Natural width and sustain |
| Synth pad | Hall or modulated reverb | 0–40 ms | 2.0–5.0 s | Expansive atmospheric tail |
For vocals, keep the dry words intelligible, raise the send until the space becomes noticeable, then back it down slightly. This vocal reverb setup guide provides more options for leads and harmonies.
For drums, decide whether the goal is a realistic room, plate-enhanced snare, or obvious effect. Sending every drum equally can create low-frequency wash; these drum reverb techniques show a more selective approach.
How Do You Set Up Reverb in a DAW?
Use a dedicated aux return with the reverb at 100% wet. Individual sends let several instruments share one space at independent levels.
- Create an aux or return channel and load a reverb plugin.
- Set the plugin’s wet signal to 100% and dry signal to 0%.
- Choose a room, plate, chamber, hall, or other suitable character.
- Adjust decay until the tail clears before it masks the next important phrase or hit.
- Set pre-delay so the dry attack stays defined.
- Filter unwanted lows and harsh highs from the return.
- Raise each source’s send from silence and judge the result in the full mix.
- Automate the send or return level when different song sections need different depth.
An insert is useful when reverb is part of one sound’s identity. Use its wet/dry control to preserve the direct signal; a shared send is usually easier for consistent space.
How Do You Sync Reverb to BPM?
Calculate one quarter-note duration in milliseconds with 60,000 ÷ BPM, then divide or multiply that result for other note values. At 120 BPM, a quarter note is 500 ms, an eighth note is 250 ms, a sixteenth note is 125 ms, and a thirty-second note is 62.5 ms.
Those numbers can guide pre-delay or decay, but exact values are not automatically best. For example, 125 ms may sound like a separate vocal echo, while a fraction can preserve the rhythmic relationship. The BPM-based reverb timing method also covers dotted and triplet values.
Set the tail near a useful rhythmic boundary, then shorten it until it clears the next phrase. Off-grid values can sound more convincing when realism matters more than an obvious rhythmic effect.
How Do You Fix Muddy or Unnatural Reverb?
Muddy reverb usually comes from excessive decay, low-frequency energy, or too many sources feeding one tail. An oversized space, metallic resonances, or excessive wet level can also sound unnatural.
| Audible problem | Likely cause | First adjustment |
| Mix becomes cloudy | Tail overlaps new notes | Shorten decay |
| Vocal sounds far away | Too much wet signal or too little pre-delay | Lower the send or increase pre-delay |
| Kick and bass lose definition | Low frequencies feed the return | High-pass the wet signal or reduce their sends |
| Snare loses impact | Reverb starts over the transient | Add a little pre-delay |
| Tail sounds metallic | Resonant algorithm, low diffusion, or unsuitable size | Change diffusion, size, or reverb type |
| Cymbals become harsh | Wet signal contains too much top end | Increase damping or reduce high frequencies |
Make one change at a time and compare it in the arrangement rather than in solo. These music-production reverb techniques connect routing, depth, tone, and automation.
Frequently Asked Questions
Should reverb be placed on an insert or a send?
Use a send when several sources should share a space or when you want separate control over the wet signal. Use an insert when reverb is integral to one sound or needs unique processing, then balance it with the plugin’s wet/dry control.
Should a reverb return be set to 100% wet?
Yes, a conventional aux or return reverb should be 100% wet because the original channel already supplies the dry signal. The send level determines how much reverb is blended into the mix.
How much pre-delay should you use on vocals?
About 20–80 ms is a useful vocal starting range, with shorter values creating more blend and longer values preserving clearer consonants. Tempo, vocal phrasing, and arrangement density should determine the final setting.
Does reverb decay have to match the BPM?
No. Tempo synchronization can help a tail clear musical boundaries, but the most natural or intelligible value may fall between exact subdivisions. Use calculated timings as references, then adjust by ear.
How many reverbs should you use in one mix?
There is no fixed number, but one or two shared spaces plus a special-effect reverb is often easier to control than a different reverb on every track. Add another reverb only when it has a distinct job that the existing spaces cannot perform.

Noah Bennett is an audio engineering writer and acoustics specialist at Reverb Calculator. He focuses on reverb time calculation, room acoustics, studio sound design, and music production tools for producers, audio engineers, musicians, and home studio creators.